


Alcoves are strange spaces. They sit there looking purposeful, recessed into the wall like they were always meant to hold something and yet most of them end up either completely empty or quietly collecting the things that don’t have a proper home anywhere else.
Horizon Bespoke Joinery tends to witness such cases from their customers. In fact, it’s one of those missed opportunities that’s so common it’s almost become normal. It really shouldn’t be, because a well-built set of alcove units is probably the single most satisfying home improvement a person can make. The storage is real, the visual impact is immediate and unlike most renovations, the result actually looks better the more someone lives with it.
Here’s how to do it properly.
Why Bother Going Bespoke
Walk into any large furniture retailer and there will be shelving systems and cabinet units that are described, in various ways, as suitable for alcoves. Some of them are even reasonably well-made. But none of them actually fit an alcove. They approximate one.
There’s always a gap. Usually, at the top, where the ceiling meets the unit and the last few centimetres of wall are just visible. Sometimes, at the sides where the recess narrows slightly, the standard width doesn’t quite reach. The unit sits in the space but doesn’t belong to it and that difference is visible every single day in a way that’s quietly irritating without always being easy to name.
Bespoke units built to the actual measurements of an actual alcove don’t have this problem. They reach the ceiling. They sit flush against the walls. They use every centimetre of the recess properly. The room looks like someone thought about it rather than just furnished it.
Measure More Than Once
The first thing anyone building alcove units needs to understand is that alcoves are almost never perfectly regular. Walls settle over time. Plaster builds unevenly. The width at the top of a recess is often different from the width at the bottom, sometimes by a centimetre or more. The floor might not be perfectly level. The ceiling might slope slightly in one direction.
None of this is a problem. It’s just reality and any good build accounts for it from the start.
Open shelving for books and display objects works differently from closed cabinets for storage. A combination of both .open at the top, closed at the bottom.is what most rooms genuinely need, because most rooms have things worth showing and things worth hiding. Deciding this before building begins determines shelf heights, cabinet dimensions, door choices and hardware. Changing direction halfway through is where projects go wrong.
Style Follows the Room, Not the Other Way Around
There’s a specific thing that happens when someone picks a style for their alcove units based on a showroom display or a photo they saved months ago. The units get built, they look perfectly fine on their own and then they sit in the room feeling slightly foreign. Not wrong enough to immediately identify the problem, just wrong enough that the room never quite settles into itself the way it should.
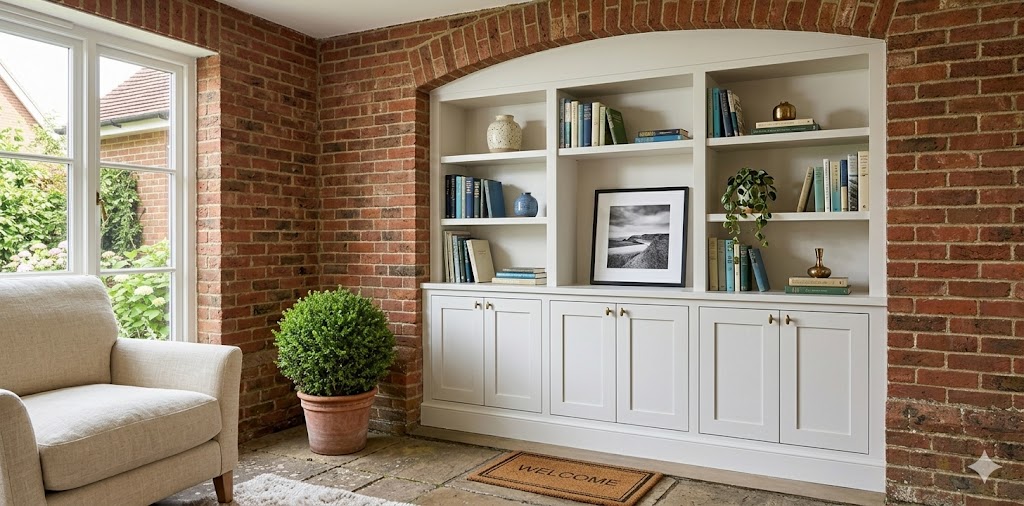
The style of a built-in unit has to come from the room it’s going into . not from a catalogue, not from what looked good somewhere else. A room with original period features already has a visual language. Cornices with traditional profiles, a fireplace with classical detailing, ceiling roses that were put there when the house was built . these elements are already telling a story about what belongs in that space. Painted units in white or off-white with clean shaker-style doors and properly considered proportions speak the same language. They don’t announce themselves. They don’t look like a recent addition that someone is pleased with. They look like they were always there, which is genuinely the highest thing a built-in unit can achieve.
Contemporary homes with flat ceilings, minimal trim and modern materials pull toward handle-less doors, flat-fronted panels and palettes that lean into the existing aesthetic rather than introducing something that competes with it.
Older cottages and characterful rooms with exposed beams or warm textures often suit timber grain finishes. There’s something about the tactile quality of real or veneered wood in those spaces that painted MDF, however well finished, can’t quite replicate.
Materials and What They Actually Mean Day to Day
Solid timber is the premium option and the most honest material to work with. It’s strong, it ages well and the grain gives finished units a quality that’s immediately apparent. The cost reflects this.
MDF is the practical choice for anything that’s going to be painted. It takes primer and paint smoothly, it’s stable and it’s significantly less expensive than solid timber without being a compromise on durability when it’s properly finished and sealed. Most painted alcove units are built from MDF because it genuinely makes sense for that application.
Veneered boards sit between the two .timber appearance and warmth, better dimensional stability than solid wood and more accessible pricing.
Hardware is where people consistently underinvest and then regret it. The hinges, drawer runners and handles on a set of alcove units get used every single day. Cheap hinges that start to droop after a year, drawer runners that stick in damp weather, handles that feel hollow. These things erode the experience of using the units in ways that are hard to anticipate until they’re happening. Spending properly on hardware is worth it every time.
Building the Framework
The framework is the part of the build that nobody talks about because there’s nothing visually satisfying about it. It’s just vertical supports, wall fixings and checking for level. But it determines whether everything that follows is solid and true or slightly off in ways that compound through every subsequent step.
Strong vertical uprights at each side of the alcove, fixed to wall studs or proper framing, not just plaster. Everything is checked for level and square before a single shelf or panel goes on. A base frame for any bottom cabinets or drawers, also level and properly fixed.
Getting this right takes more time than it feels like it should. That time is worth spending. A framework that’s off by a couple of degrees creates doors that don’t hang straight, shelves that look slightly tilted and a general wrongness that’s difficult to fix once the visible elements are in place.
Shelves, Doors and Finishing
Door style does more to shape the look of finished units than almost any other decision. Shaker doors feel classic and considered and work across an enormous range of interior styles. Slab doors are clean and contemporary. Grooved or framed options add character that suits older properties particularly well.
Everyone who has ever painted anything in a hurry knows exactly how it ends. The brush marks are visible in certain light. The paint starts lifting at the edges sooner than it should. The whole thing looks fine in photographs and slightly wrong in person. With alcove units, this is even more noticeable because the units are looked at every single day in a room people actually live in.
Filling every dent and nail hole, sanding properly between coats, priming before the topcoat goes on . None of this is complicated, it’s just slow. And slow is the part most people skip when they’re excited to see the finished result. The problem is that paint is honest. It shows exactly what’s underneath it. A surface that was rushed through preparation looks rushed. A surface that was taken seriously looks like someone built it that way on purpose.
Lighting follows the same principle. Most people decide they want shelf lighting after the units are already finished, which means cables get tucked in awkwardly and the result never quite looks intentional. Planned from the beginning . LED strips running underneath shelves, a small spotlight or two aimed at whatever’s being displayed, a dimmer switch that lets the mood shift from bright and functional in the afternoon to something warmer in the evening . it changes the entire character of the room after dark. An alcove that looks like storage in daylight starts to look like the best corner of the house once the main lights go down.
Conclusion
Straightforward alcoves in reasonably regular walls are manageable for a confident and patient DIYer. Anything more complex, significant wall irregularities, period architectural details that need to be carefully worked around or where the finish needs to be genuinely seamless.is worth putting in the hands of someone who builds these regularly.
Horizon Bespoke Joinery specialises in exactly this: custom alcove units designed around the specific space, built to last and finished to a standard that a fitted unit should reach.